Tuesday, November 6, 2012

Bacon Guacamole + Salsa Cruda


Every Sunday my family and friends get together for 'Amazing Race Night'. If you haven't seen Amazing Race (what rock are you hiding under?), it's an American reality TV show with several teams of 2, racing around the world for a $1,000,000 prize. Our group is fairly adventurous and well traveled so we really enjoy all the different tasks they perform and locations they go to (and the drama amongst the teams is pretty entertaining as well).


We all take turns hosting each Sunday. Whoever hosts prepares the main course, with the rest divvying up appetizer, salad, bread/side dish, dessert and drinks. Last week I brought my Greek yogo honey pops, which were a hit! This past Sunday, I was responsible for the appetizer. Since our hosts were making Pozole (a traditional Mexican soup prepared with hominy and shredded meat and served with several fresh vegetable garnishes), I wanted to bring something to fit along with the Mexican menu.


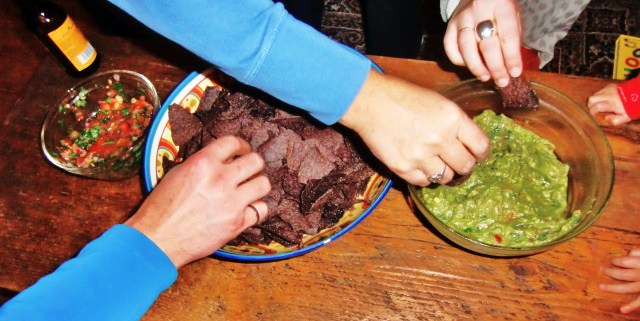
I love avocados! I love bacon! As my friend said on Sunday, you'd be hard pressed to find something that is not improved by the addition of bacon. So I made bacon guacamole! After trying it, I'm not sure how bacon is not a mandatory ingredient in all guacamole recipes, but at least for me, (and maybe everyone who tried it on Sunday) it will be from now on.


After I finished making the guacamole I felt I needed something more (we have a crew of 11 adults and 1 toddler), so I used almost all the exact same ingredients and whipped up a fresh salsa cruda (mentioned here) as well.


They were both raved over, and disappeared in minutes (I'm slightly ashamed to tell you that we even drank the juice from the bottom of the salsa cruda bowl). Fresh. Simple. Delish. A great start to the amazing Pozole that followed (and I have to mention the crème brûlée that followed that, omgsogood)!


So, here she is in all her glory:


Bacon Guacamole

6 slices bacon
4 large ripe avocados
4 Tbsp fresh lime juice from 1 large lime (and zest minced, *optional)
4 green onions, finely chopped
1/2 cup cilantro packed, roughly chopped
1/4 cup red onion, minced
1 medium tomato, chopped
3 cloves garlic, minced
1  jalapeño, finely chopped (or other chilli of choice, I used an inferno chilli from my garden)
1 tsp ground cumin
Salt and freshly ground pepper

Fry bacon until crisp, then leave to cool/drain on paper towels.
[Easy no splatter bacon tip: place cold bacon on a tinfoil lined, edged cookie sheet. Put in a COLD oven and turn heat on to 400° F. Bake for 20 minutes. Bacon:done.]
Spoon the avocados into a large bowl and roughly mash with the lime juice. Crumble the bacon and mix in along with the rest of the ingredients. Season with salt and pepper to taste. Rest in fridge for 1 hour before serving to let the flavours blend. Serve with tortilla chips.
Makes approx. 4 cups.


Salsa Cruda

[aka Salsa Fresca, Salsa Mexicana, Pico de Gallo & Salsa Bandera]

3 medium tomatoes, diced
2 Tbsp fresh lime juice from 1/2 a large lime (and zest minced, *optional)
1/2 cup red (or white) onion, diced
3 green onions, finely chopped
1/4 cup cilantro packed, roughly chopped 
2 cloves garlic, minced
1 small jalapeño, finely chopped (or other chilli of choice)
Salt and freshly ground pepper

Add all ingredients into a medium sized bowl and stir to combine. Season with salt and pepper to taste. Let rest an hour, refrigerated, to allow flavours to blend. Serve with tortilla chips.
Makes approx. 2 cups.

I usually add a finely diced (yellow) bell pepper to my salsa to add more colour and texture, I just didn't have any on hand this time.


Purists will tell you that salsa cruda (pico de gallo) should only consist of jalapeño, white onion and tomatoes. This is supposed to represent the colours of the Mexican flag. I however, disagree because cilantro, garlic and all the other fresh ingredients added together make it SO much tastier! I say get creative, throw some diced jicama or mango in there. Serve it on chicken or with seafood (or with eagle and snake to truly satisfy those purists). Explore food, make it your own and enjoy!


Buen provecho!

Wednesday, October 31, 2012

Cheesy Zucchini Bites


Cheesy Zucchini Bites


2 cups grated zucchini
1/2 cup chopped onion (I used green onion)
1/4 cup minced fresh parsley
2 eggs
1/2 cup shredded cheddar cheese
1/2 cup breadcrumbs
salt & pepper to taste

Preheat oven to 400°. Squeeze the water out of your zucchini with some paper towels. Throw everything in a large bowl and mix to combine. Grease some mini muffin tins, and spoon mixture in to fill. Put in preheated oven and bake for 15-18 minutes or until golden brown.
Enjoy!
That was easy, right?


Unless you used regular sized muffin tins and over-filled them. And then decided that they probably wouldn't cook through so you pulled half the mixture out but didn't re-grease the pan. And then after they were cooked, you tried to pull them out but they were all stuck to the bottom. And then you ended up finishing them off in the cast iron pan to crisp the broken bottoms up. Don't do that, okay guys?


I made a spicy mayo dipping sauce to serve with. Yum. Delicious, even if you completely screw them up!

Happy Halloween, friends!
Buen provecho!

Wednesday, October 17, 2012

Homemade Crock Pot Greek Yogurt + Frozen Yogurt Honey Pops!

Homemade Crock Pot Greek Yogurt


Yesterday I started a batch of Greek yogurt, in my crock pot. I will never make yogurt any other way. It's so simple!
Homemade yogurt is extremely high in lactobacillus acidophilus live cultures which are great for fighting the yeast present in your body. When making yogurt make sure your starter contains 'live and active cultures'. These cultures multiply during the yogurt making process and when ingested, help your body to beat yeast infections and fight fatigue as well as assisting with weight loss. If consumed on a regular to semi-regular basis, homemade yogurt can eliminate the internal yeast infection present in your body and help you lose up to 25lbs! Plus, it tastes way better than store bought yogurts and is much cheaper!


Ingredients:
8 cups milk (whole, 2%, 1% or skim; not ultra pasteurized)
1/2 cup plain yogurt (store bought or from a previous batch) [this is your starter]

Other materials:
Crock pot
Candy thermometer
Large strainer and bowl
Cheesecloth

Directions:
Pour milk into crock pot, cover and set to low heat. Leave it to heat for approximately 2.5-3 hours.
Check the temperature using your candy thermometer. Once the milk has reached 180°, turn off the crock pot, remove the lid and leave to cool for an hour or so.
When the temperature has dropped to 110°, remove a cup of the warm milk and whisk into it 1/2 cup of plain yogurt. Pour mixture back into crock pot and stir.
Replace lid, cover crock in a heavy bath towel and place in the oven with the oven light on. Leave to rest for approximately 8-12 hours or overnight.
Carefully remove crock from the oven, unwrap, uncover and check to see that the milk has thickened to yogurt. If not, place it back in oven and re-check in an hour or so.
You now have your own homemade yogurt!

Oh, but you wanted Greek yogurt, right? Okay,

Place crock in the fridge for 3 hours to completely cool and thicken.
Line strainer with several layers of cheese cloth and place inside a large bowl. Pour yogurt into strainer and refrigerate. The longer you strain the yogurt the thicker it will be (minimum 2 hours), just don't strain it for TOO long or you'll end up with cream cheese!

The yellowish liquid in your bowl is whey. Don't throw it out! It's super high in protein, vitamins and minerals and can be used in so many wheys (ways, get it?)! My favourite uses are: lacto-fermentation or as a substitute for water in almost any recipe, especially in baking and soup. (I'm also working on a whey after-workout protein supplement recipe for El Señor, which I will post as soon as I have perfected it.)

Oh, by the way, your Greek yogurt is ready!
Isn't it so thick and creamy? Don't you just want to throw some berries in and eat it by the bowl-full?
Yum! Just make sure you save 1/2 cup for your next batch!


Frozen Yogurt Honey Pops


The other day my Brother and cuñada (sister-in-law, for all you gringos), gave me a honey flavoured Greek frozen yogurt bar, which really, was my inspiration for making yogurt in the first place.
It was delicious! Rich, creamy, sweet and surprisingly not ice cream. But I did notice that the 3rd ingredient is sugar.
So I re-created it and my bars only have 2 ingredients, not 9 (and sugar isn't one of them).

Ingredients:
1 1/2 cups Greek yogurt
1/4 cup honey

These proportions may vary to the size of your molds, so adjust accordingly. This gave me approximately five 1/3 cup servings.

Directions:
Measure out both ingredients into a bowl and stir to thoroughly incorporate. Spoon into molds and freeze for 8 hours or overnight.
Run bottom of mold under hot water for 10 seconds to release popsicle.
Enjoy!

I find them to be slightly more tart than the store bought yogurt bars, but I like it. Tastes like the delicious yogurt we just made!


"If they're so good for you, let me try some!"
Buen provecho!

Saturday, October 6, 2012

Pear Scones


I love any food that leaves my house smelling like a French bakery. This recipe is no exception. Slightly sweet with a gentle spice, and a soft fluffy texture, these scones will not disappoint!


Serve with jam or homemade preserves and tea and you've got yourself a simply delicious brunch.


Pear Scones


1 cup all-purpose flour
3/4 cup whole wheat flour
1/3 cup packed brown sugar
2 teaspoons baking powder
1/2 teaspoon ground cinnamon
1/2 teaspoon ground ginger
1/4 teaspoon nutmeg
1/4 teaspoon orange rind
1 pinch salt
1/3 cup butter, chilled
1 large egg
1/2 cup half-and-half cream or evaporated milk
1 teaspoon vanilla
1 cup chopped pear 

Preheat oven to 375 degrees F. 
Sift together the flour, brown sugar, baking powder, spices and salt in a large bowl. Cut in the butter until the mixture has a crumbly texture.
Whisk together the egg, cream/milk and vanilla in a separate bowl. Stir the egg mixture into the flour mixture until combined. Stir in the pear.
Drop large spoonfuls of the dough onto an un-greased baking sheet.
Bake in preheated oven until golden brown, about 15-17 minutes. Rest briefly on a cooling rack before serving.

Makes 18 small to medium sized scones. 
Buen provecho!

Thursday, October 4, 2012

Homemade Canned Salsa


Summer is officially over. The howling wind and my yard covered in leaves confirm it. The bright side is that I have several pounds of fresh, home-grown produce to show for the end of the season.


Specifically, tomatoes.


I wasn't sure what to do with them, as I can only eat so many slices of toast-with-butter-and-sliced-tomatoes-and-salt-and-pepper (a family favourite). But I knew I wanted to can some this year, as I had never canned tomatoes before, and I wanted to be able to enjoy that sweet taste of summer in the middle of cold friggin Alberta winter.
So, I made a tomato sauce!
I cored all the tomatoes, made a small X on the bottom and placed in simmering water for a few seconds. Peeled all the skins off, roughly chopped and simmered them uncovered, in a large pot for about 40 minutes. I had a sterile can all ready to go, poured the sauce in, put the lid and ring on and then...

...remembered that I don''t really like tomato sauce.
So I put it in my fridge for a day while I thought up something better to do with it.

What's made out of tomatoes, is usually canned, would be good in the middle of winter and that I actually like??

...SALSA!

I love salsa. When I was a kid, my Dad always had a giant jug of salsa and some tortilla chips somewhere nearby. And my Mom would make the best Salsa Cruda (until I started making it, that is). Also, my partner is Mexican. Which, though cliché and somewhat of a generalization, means he loves salsa too.

So why not combine my dad's store bought, always-on-hand salsa with my mom's fresh, spicy, homemade goodness? El Señor and I can have summertime tasting, spicy homemade salsa in the middle of January without leaving the house!

And so, without further ado, I give you:

Homemade Canned Salsa

4 pounds tomatoes (or so) [to be honest I didn't measure]
1 red & 1 green bell pepper
2 whole serrano chillies (could use 3 jalapeño, 1 habanero or whatever you prefer)
1 medium red onion, chopped
4 chopped green onions
1/2 cup chopped cilantro
5 cloves garlic
1/2 cup vinegar (I used a combination of my homemade mango vinegar -recipe to follow- and white vinegar) [I didn't measure this either]
1/2 cup tomato puree (or 1/3 cup tomato paste if you want a thicker salsa) [or this]
1 teaspoon black pepper
2 teaspoons chili powder
1 Tablespoon onion powder
2 teaspoons dried oregano
2 teaspoons cumin
1 teaspoon coriander
2 Tablespoons salt (canning, sea, whatever) [I didn't measure any of the spices, so really, here's hoping that you get the same salsa as me!]

Peel and chop tomatoes and place them in a large pot to simmer uncovered, stirring frequently, for 40 minutes.Seed and coarsely chop peppers. Place all peppers, chillies, onions, cilantro, and garlic in a food processor and pulse until somewhat smooth (you still want some chunks and texture), then add to tomatoes. Add all remaining ingredients and simmer for 20 minutes. Ladle into hot, sterile jars, leaving 1/2" head space. Process for 15 minutes in a boiling water bath (make sure you understand the basics of canning before you begin, and follow the directions for the brand of cans you're using).

This recipe makes 6 1/2 cups of salsa.
Adapted from: luluthebaker.
(I'll add some pictures of the salsa when I open the jars, promise!)


I had about half a cup left over after filling the cans, so I just put it in a bowl. I left it in my fridge for a day to let the flavours mingle. Guess what? Those flavours mingled, got married, had a baby and named it YUM! (I don't know what that means, but we're going with it).
It looked like store-bought canned salsa; slightly thick and chunky, but tasted way better! The surplus of cilantro and spices give it an extra burst of flavour, and it wasn't too vinegar-ey. I had used a combination of small and large tomatoes, and the small ones gave it a delicious fresh sweetness that I know will be appreciated come winter. My friends who discovered it in the fridge also gave it high praise and, unfortunately for me and El Señor, ate it all.

Now I just have to perfect the homemade tortilla chip!
Buen provecho!